
Pixelscan Setup: How to Test and Harden Your Browser

Pixelscan Setup: How to Test and Harden Your Browser
Pixelscan is a free, browser-based multi-check tool that shows how websites and fraud-detection systems see your connection. A single scan runs fingerprint analysis, proxy detection, IP lookups, DNS leak tests, bot checks, and blacklist lookups in one place. This guide explains how to set up a Pixelscan workflow, interpret the results, and fix the issues that matter most.
What Pixelscan Actually Tests

Pixelscan Setup: How to Test and Harden Your Browser - What Pixelscan Actually Tests.
Pixelscan combines several diagnostics that are usually spread across separate tools:
- Browser fingerprint analysis — measures how unique and consistent your browser appears
- Proxy and VPN detection — flags datacenter, residential, mobile, or misconfigured VPN traffic
- IP analysis — shows your public IP, location, ISP, and whether the IP is blacklisted
- DNS leak detection — reveals whether DNS queries bypass your VPN or proxy
- WebRTC leak detection — checks whether WebRTC exposes your real local or public IP
- Bot detection — identifies headless browsers and automation traces
- Location consistency — compares IP geolocation, timezone, and browser language
Because all checks run in one scan, Pixelscan is useful for validating a proxy, VPN, or antidetect browser setup before you rely on it for real work.
How to Set Up a Pixelscan Test
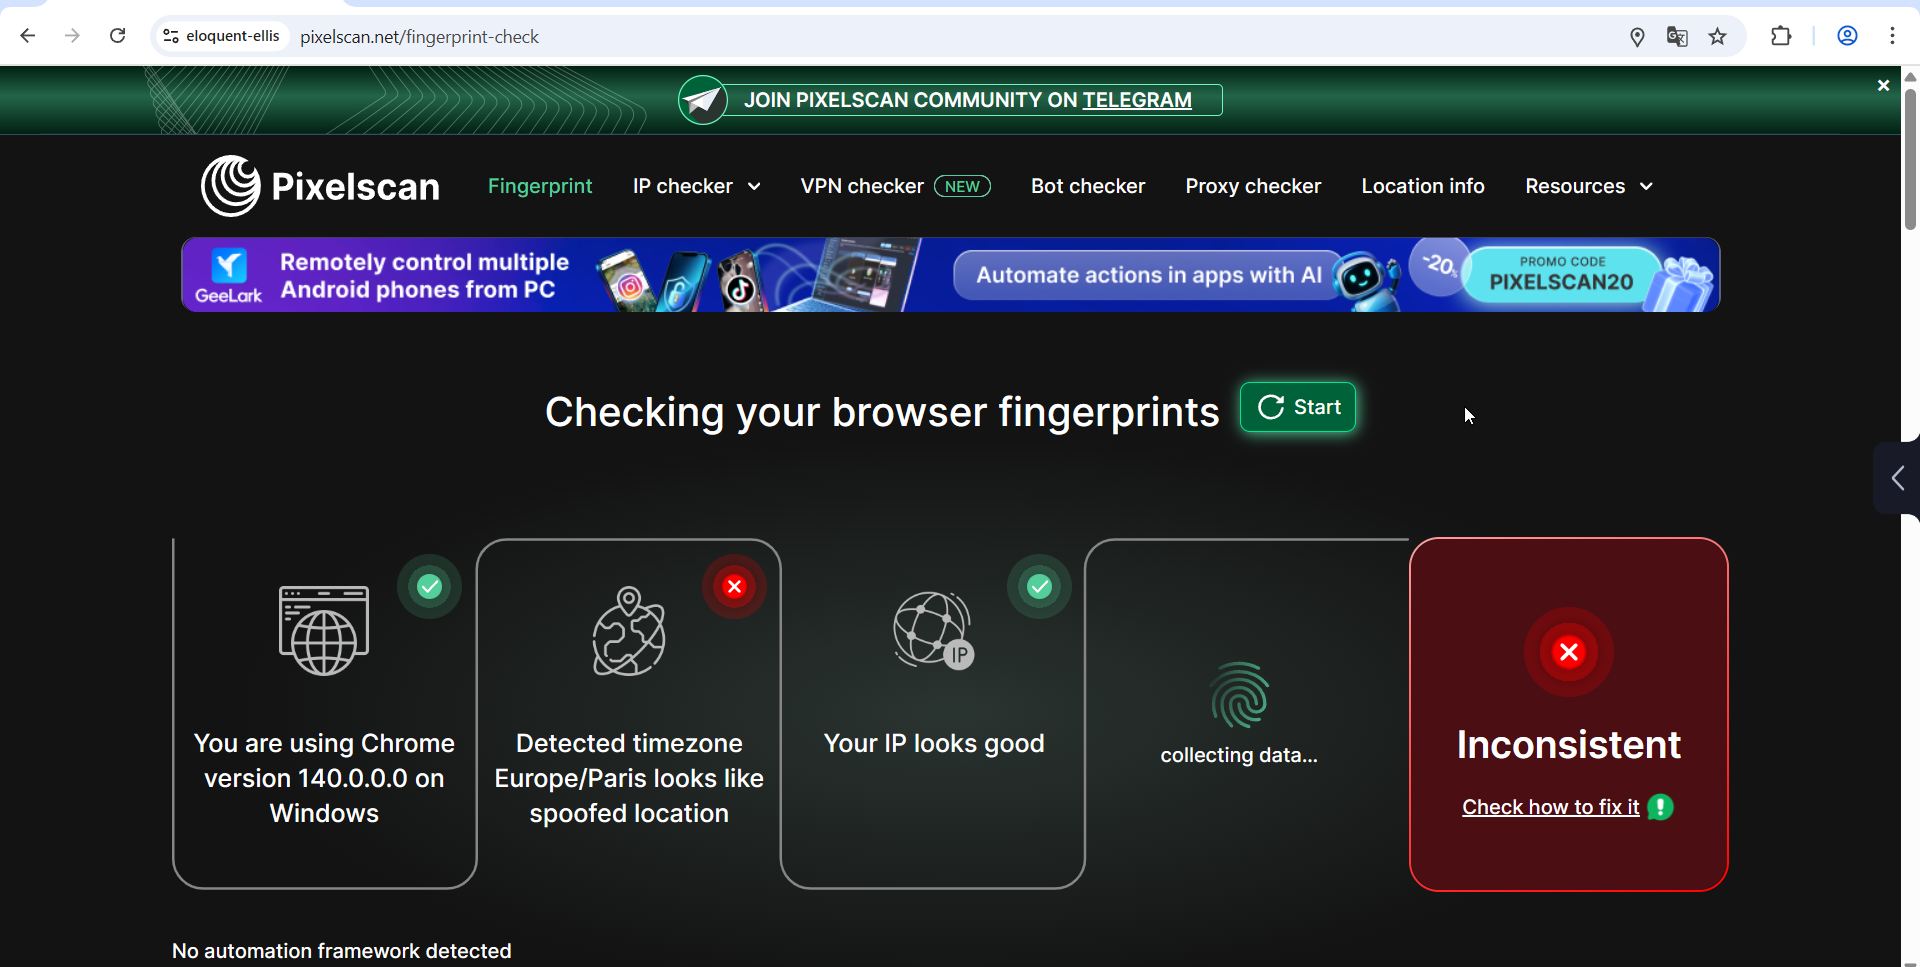
Pixelscan Setup: How to Test and Harden Your Browser - How to Set Up a Pixelscan Test.
1. Start from a clean browser profile
Run the scan in the same browser profile and environment you plan to use for the actual task. If you manage multiple accounts, test each profile separately. A clean profile avoids extensions or cached data from skewing the results.
2. Configure your proxy or VPN first
Set up your proxy, VPN, or antidetect browser before opening Pixelscan. If you change the connection after the page loads, the scan may mix old and new network data. For Chrome, proxy settings are handled through the operating system or a proxy extension. Configure the server address, port, and credentials, then restart the browser.
3. Run the scan
Open Pixelscan and click Scan My Browser. The tool runs all checks automatically and returns a report in seconds. No installation or account is required.
4. Review the report in order
Work through the report from network-level checks to browser-level checks:
- IP address and location — confirm the IP matches your proxy or VPN exit node, not your real ISP
- DNS and WebRTC — verify neither leaks your real IP or ISP DNS servers
- Proxy detection — check whether the connection is flagged as a proxy, VPN, or datacenter IP
- Fingerprint consistency — compare timezone, language, screen resolution, and OS against the IP location
- Bot and automation signals — look for headless browser or automation traces
Interpreting Common Pixelscan Results
Pixelscan Setup: How to Test and Harden Your Browser - Interpreting Common Pixelscan Results.
IP matches the proxy but location is inconsistent
If the IP belongs to your proxy but the timezone or language still points to your real location, the fingerprint is inconsistent. Detection systems treat mismatches as a red flag. Fix the browser timezone, language, and locale to match the IP's geolocation.
DNS leaks despite a working VPN
A DNS leak means DNS queries are going to your ISP instead of the VPN tunnel. This can expose your real location even when the IP is masked. Switch to a VPN with built-in DNS leak protection, or manually set DNS servers that match your VPN provider.
WebRTC exposes the real IP
WebRTC can reveal your local or public IP even when a VPN or proxy is active. Disable WebRTC in the browser, use an extension that blocks WebRTC leaks, or choose a VPN that filters WebRTC traffic at the network level.
Proxy detected as datacenter
Datacenter IPs are easier for websites to flag than residential or mobile IPs. If the goal is to avoid proxy detection, a residential proxy is usually more reliable, though slower and more expensive. For general privacy, a datacenter IP may be acceptable depending on the target site.
Building a Repeatable Testing Workflow
Pixelscan Setup: How to Test and Harden Your Browser - Building a Repeatable Testing Workflow.
A one-time scan is useful, but a repeatable workflow catches regressions before they cause problems.
- Test before every session — run Pixelscan after connecting to a proxy or VPN, not just once
- Test each profile — antidetect browser profiles can drift over time; verify each one
- Test after browser updates — updates can reset privacy settings or change fingerprint signals
- Document your baseline — save a screenshot or note of a clean result so you can spot changes quickly
For a deeper look at how fingerprinting works and why consistency matters, see Browser Fingerprinting: How It Works and How to Test Yours.
Pixelscan vs. BrowserScan: Which Should You Use?
Pixelscan and BrowserScan overlap in several areas, but they serve slightly different workflows.
| Feature | Pixelscan | BrowserScan |
|---|---|---|
| Browser fingerprint analysis | Yes | Yes |
| DNS leak test | Yes | Yes |
| WebRTC leak test | Yes | Yes |
| IP lookup and proxy detection | Yes | Yes |
| Port scanning | No | Yes (Nmap-powered) |
| Internet speed test | No | Yes |
| User agent parser | No | Yes |
| Canvas fingerprint checker | No | Yes |
| Client hints analyzer | No | Yes |
Pixelscan is a strong all-in-one privacy diagnostic. BrowserScan adds network-level utilities like a port scanner and speed test, plus parsing tools for user agents and client hints. If you need to verify a VPN for leaks and also check whether open ports are exposed on your network, BrowserScan covers both in one platform. For a broader privacy plan that includes threat modeling and tool verification, see Privacy Guides: Build a Realistic Digital Privacy Plan.
Common Setup Mistakes to Avoid
Testing with the wrong profile
Running Pixelscan in a clean browser when you actually work in a separate antidetect profile gives you a false sense of security. Always test the exact profile and environment you will use.
Ignoring timezone and language mismatches
An IP in Frankfurt with a New York timezone and English-only language settings is an obvious inconsistency. Detection systems weigh these signals heavily.
Forgetting to re-test after changes
Changing a proxy, updating a browser, or installing an extension can silently break a previously clean setup. Re-test after any meaningful change.
Relying on a single check
No single tool catches every issue. Use Pixelscan for fingerprint and leak checks, then cross-verify with an IP lookup and a port scan if network exposure is a concern.
How to Fix the Most Common Issues
Leaks
- DNS leaks — enable DNS leak protection in your VPN, or set custom DNS servers
- WebRTC leaks — disable WebRTC or use a leak-blocking extension
- IPv6 leaks — disable IPv6 if your VPN only tunnels IPv4
Fingerprint inconsistencies
- Match timezone, language, and locale to the IP location
- Use a consistent screen resolution and OS across sessions
- Avoid mixing browser versions and user agents
Proxy detection
- Prefer residential or mobile IPs over datacenter IPs when detection avoidance matters
- Rotate IPs less frequently to avoid triggering anomaly detection
- Keep session duration realistic for the target site
For VPN-specific testing, see What Is a Virtual Private Network (VPN)? How It Works & Types.
Related reading
- What Is IPsec? How IPsec VPNs Secure Your Traffic - Learn how IPsec works, the difference between AH and ESP, tunnel vs transport mode, IKE key exchange, and how to test your IPsec VPN for leaks.
Sources and further reading
- Pixelscan | Fast multi-check tool for detection analysis - Pixelscan is a complete multi-check tool for browser fingerprinting, proxy detection, IP analysis, DNS leaks, and more. See how detectable your setup really is.
- How to add and configure proxy settings in Chrome for privacy and security | Pixelscan - Google Chrome is one of the most popular browsers worldwide. There are several reason to that - its speed, functionality, and ease of use. However,
- Check IP ✅ IP Address Lookup & Detection Info with Pixelscan - Check IP with Pixelscan — instantly view your IP address, location, and connection details to understand how detection systems see you online.
Frequently Asked Questions
Is Pixelscan free?
Yes. Pixelscan runs a full scan without requiring an account or payment. The tool states that test results are not stored or linked to an identity.
Does Pixelscan work with antidetect browsers?
Yes. Pixelscan is designed to work with proxies, VPNs, and antidetect browsers. Configure your tool first, then run the scan to verify the setup.
How often should I run a Pixelscan test?
Run a scan before every session that depends on anonymity or account separation, after browser updates, and after changing any proxy or VPN configuration.
What does a high uniqueness score mean?
A highly unique fingerprint makes your browser easier to track across sites, even if your IP changes. Reducing uniqueness often means blending in with common browser configurations rather than standing out.
Can Pixelscan detect all proxies?
No tool detects every proxy. Pixelscan flags common datacenter, VPN, and known proxy patterns, but high-quality residential proxies can be harder to identify. Use multiple checks for higher confidence.
What should I do if my IP is blacklisted?
A blacklisted IP can trigger blocks or extra verification on some sites. Switch to a different IP, request removal from the blacklist if possible, or use a cleaner proxy pool.
Conclusion
Pixelscan setup is less about installation and more about building a consistent testing routine. Configure your proxy or VPN first, run the scan in the exact browser profile you will use, and review the report from network-level leaks down to fingerprint consistency. Fix DNS and WebRTC leaks immediately, align timezone and language with the IP location, and re-test after every meaningful change. Pair Pixelscan with complementary tools when you need network-level checks beyond fingerprinting, and treat the scan as a recurring habit rather than a one-time event.