
BrowserLeaks Setup: How to Run Privacy Leak Tests Correctly

BrowserLeaks Setup: How to Run Privacy Leak Tests Correctly
BrowserLeaks is one of the most widely referenced free testing suites for identifying what your browser exposes to websites. But simply opening the homepage and glancing at a few numbers is not a proper setup. To get reliable results, you need to know which tests matter, how to configure the site settings, what a clean baseline looks like, and how to interpret failures when they appear.
This guide walks through a practical BrowserLeaks setup workflow: preparing your browser, running the core leak tests in the right order, reading the output, and fixing common leaks. It also covers when a complementary tool like BrowserScan makes sense for cross-checking results.
What BrowserLeaks Actually Tests

BrowserLeaks Setup: How to Run Privacy Leak Tests Correctly - What BrowserLeaks Actually Tests.
BrowserLeaks is not a single test. It is a collection of independent browser-based diagnostics, each targeting a different data exposure vector. The main categories include:
- IP address and network identity: public IP, ISP/ASN, geolocation, reverse IP lookup, and HTTP request headers
- WebRTC leaks: whether the WebRTC API can reveal your real local or public IP even behind a VPN or proxy
- DNS leaks: whether DNS queries bypass your VPN tunnel and expose your ISP's resolver
- Canvas fingerprinting: whether HTML5 Canvas rendering produces a stable, unique identifier for your browser
- WebGL report: GPU and graphics driver details that contribute to fingerprint uniqueness
- Font fingerprinting: system font enumeration and rendering differences
- TLS/SSL client test: supported protocols, cipher suites, JA3/JA4 fingerprints, and ECH support
- Geolocation API test: how your browser responds to location permission requests
- Content filter detection: whether ad blockers, Tor, or other filters alter page content
Each test runs entirely in your browser. BrowserLeaks states that it does not store fingerprints or set non-essential cookies, which makes it a reasonable choice for repeat testing.
Step 1: Prepare a Clean Testing Environment

BrowserLeaks Setup: How to Run Privacy Leak Tests Correctly - Step 1: Prepare a Clean Testing Environment.
Your setup matters more than the tool itself. A leak test run with extensions active, a VPN disconnected, or a previous session cached can produce misleading results.
Use a dedicated test profile
Create a separate browser profile with default settings and no extensions. Extensions like ad blockers, privacy badgers, and script managers can alter canvas output, block WebRTC, or change HTTP headers. That changes what the test sees and may hide or exaggerate leaks.
Decide what you are testing
There are two distinct goals:
- Baseline testing: understand what your everyday browser reveals with your normal extensions and VPN setup active.
- Isolation testing: verify a specific layer, such as whether your VPN leaks DNS, by disabling everything except the VPN.
Run baseline tests first, then isolation tests. If you only test with a hardened setup, you will not know what your actual daily browsing profile exposes.
Connect your VPN or proxy before testing
If you are verifying VPN protection, connect the VPN first and confirm the connection is active. Then run the IP, DNS, and WebRTC tests. Testing without the VPN tells you nothing about whether the VPN leaks.
Step 2: Configure BrowserLeaks Site Settings
BrowserLeaks Setup: How to Run Privacy Leak Tests Correctly - Step 2: Configure BrowserLeaks Site Settings.
BrowserLeaks includes a site settings page that controls optional features. The defaults are privacy-conscious, but a few toggles affect test accuracy.
Key settings to review:
| Setting | What it does | Recommendation |
|---|---|---|
| Analytics | Controls third-party analytics on test pages | Leave disabled for cleanest tests |
| Maps | Loads map tiles from a CDN on IP/Geo pages | Disable if you want zero third-party requests |
| Geolocation API | Enables auto-listening watchPosition and reverse geocoding | Enable only when testing the Geolocation API |
| Acceptable Ads | Allows partner attributions and cosmetic ads | Leave disabled |
| Raw HTTP Headers | Shows unfiltered request headers on the IP page | Enable for detailed header inspection |
| Raw WebGL Keys | Displays raw WebGL parameter keys | Enable when analyzing WebGL fingerprints |
| Raw WebGPU Keys | Displays raw WebGPU parameter keys | Enable when analyzing WebGPU reports |
For most leak tests, the default settings are fine. The raw output toggles are useful when you need to compare exact values across browsers or sessions.
Step 3: Run the Core Leak Tests in Order
BrowserLeaks Setup: How to Run Privacy Leak Tests Correctly - Step 3: Run the Core Leak Tests in Order.
The order matters because some tests depend on the same underlying network path. Run them in this sequence for a coherent picture.
1. IP address test
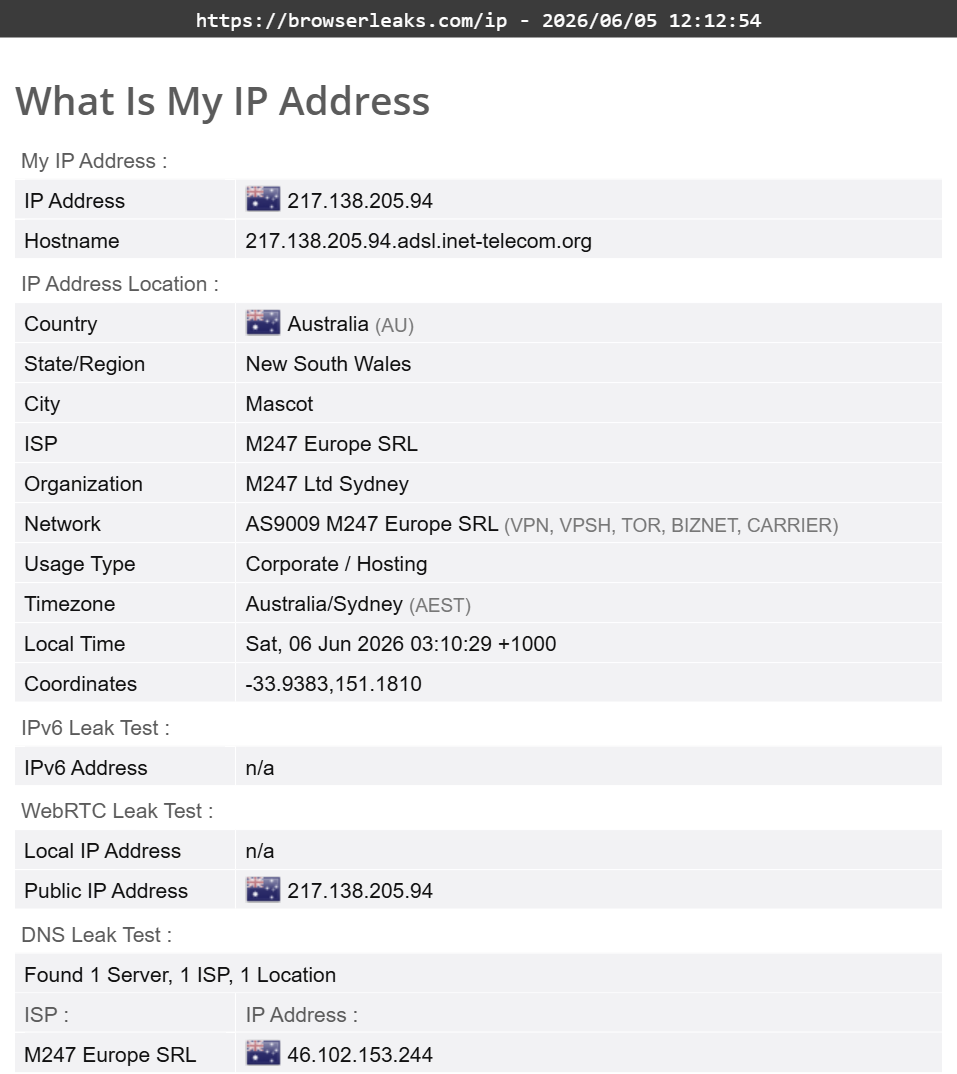
Start with the IP page. It shows your public IP, country, state, city, ISP/ASN, and local time. With a VPN active, every value should match the VPN exit server, not your home connection.
What to check:
- The IP shown matches your VPN's advertised exit location
- The ISP/ASN belongs to the VPN provider or its hosting partner, not your residential ISP
- IPv6 is either disabled or also routed through the VPN
If the page shows your real IP while the VPN is connected, you have an immediate failure that makes all other tests secondary.
2. DNS leak test
A DNS leak occurs when your browser or operating system sends domain resolution requests outside the VPN tunnel. The standalone DNS leak test page lists the DNS servers handling your queries.
What to check:
- All listed DNS servers belong to the VPN provider or a trusted third-party resolver you configured
- No servers match your ISP's known resolver addresses
- Results are consistent across repeated runs
If you see your ISP's DNS servers, your VPN is leaking. The fix is usually enabling DNS leak protection in the VPN client or forcing DNS through the VPN interface at the OS level.
3. WebRTC leak test
WebRTC can bypass VPN routing by communicating directly with STUN servers. The WebRTC leak test page attempts to discover your local and public IP addresses through the WebRTC API.
What to check:
- No private IP addresses (192.168.x.x, 10.x.x.x, 172.16-31.x.x) appear when they should be hidden
- The public IP shown matches the VPN exit IP, not your real public IP
- If you are not using WebRTC-dependent apps, the cleanest result is no IP disclosure at all
Browser-level fixes include disabling WebRTC or using an extension that controls WebRTC behavior. VPN clients with built-in WebRTC leak protection are the most reliable option.
4. Canvas fingerprint test
The canvas test renders a hidden image using the HTML5 Canvas API and hashes the result. Because rendering varies by GPU, driver, OS, and browser, the hash can act as a stable identifier.
What to check:
- Your canvas hash is not unique across a large sample of browsers
- The hash changes when you switch browser profiles or use anti-fingerprinting tools
- The reported hash remains stable within the same profile, which is expected
Canvas fingerprinting is difficult to eliminate without breaking functionality. The practical goal is reducing uniqueness, not achieving a blank fingerprint.
5. WebGL report
The WebGL report exposes your GPU vendor, renderer string, and supported extensions. Combined with canvas output, this data significantly narrows down your hardware identity.
What to check:
- The renderer string does not reveal an unusually specific hardware configuration
- If you use an anti-detect browser, the WebGL values match the spoofed profile consistently
- No raw GPU identifiers appear that could be cross-referenced with other sites
6. TLS client test
The TLS test inspects your ClientHello, supported cipher suites, TLS extensions, and generates a JA3/JA4 fingerprint. This fingerprint identifies your TLS client implementation and can be used for tracking even when IP and cookies are cleared.
What to check:
- Your JA3/JA4 hash is not unique compared to common browser versions
- Weak protocols like TLS 1.0 and 1.1 are disabled
- ECH support status is noted if you rely on encrypted SNI
TLS fingerprints are largely determined by your browser version. Keeping your browser updated is the simplest way to stay within a large fingerprint cohort.
Step 4: Interpret Results Correctly
A common mistake is treating every non-default value as a leak. That is not how browser fingerprinting works.
What is actually a leak
A leak is a specific failure where a privacy layer you intentionally added is bypassed:
- VPN connected, but real IP visible
- VPN connected, but ISP DNS servers resolving queries
- Proxy active, but WebRTC exposing the local network address
- Anti-detect profile active, but canvas hash matching the real hardware profile
What is just a fingerprint signal
A fingerprint signal is any stable attribute that contributes to browser uniqueness. Your screen resolution, installed fonts, timezone, and language settings are all signals. They are not leaks unless they contradict the identity you are trying to present.
For example, if you are using a VPN to appear in Germany but your browser reports a US timezone, that mismatch is a consistency problem, not a leak. It makes your fingerprint more suspicious.
Step 5: Fix Common Leaks
DNS leak fixes
- Enable DNS leak protection in your VPN client
- Set your OS DNS servers to the VPN provider's resolvers
- Disable IPv6 if your VPN does not support it
- Re-run the DNS leak test after each change
WebRTC leak fixes
- Use a VPN client with WebRTC leak protection
- Disable WebRTC in browser flags or settings where supported
- Install a WebRTC control extension and test with the WebRTC leak page
- For anti-detect browsers, verify WebRTC spoofing matches the profile IP
IP leak fixes
- Confirm the VPN kill switch is enabled
- Check for IPv6 leaks by disabling IPv6 or using a VPN with IPv6 support
- Test with the VPN connected to different servers to rule out a single-server issue
Fingerprint uniqueness fixes
- Use a browser with built-in fingerprint protection
- For multi-accounting or automation, use an anti-detect browser with consistent profile spoofing
- Keep your browser version current to stay in a large fingerprint cohort
- Avoid installing rare fonts or unusual extensions that increase uniqueness
Cross-Checking with BrowserScan
BrowserLeaks is thorough, but no single tool catches everything. Cross-checking with a second platform helps confirm results and catch inconsistencies.
BrowserScan offers a complementary set of free web-based diagnostics, including browser fingerprint analysis with an authenticity score, DNS and WebRTC leak tests, IP lookup with proxy detection, and a port scanner. The authenticity score is particularly useful after changing browser settings: it tells you whether your fingerprint looks like a real, consistent browser profile or a modified one that stands out.
A practical workflow is:
- Run BrowserLeaks tests to identify specific leak vectors
- Apply fixes
- Re-run BrowserLeaks to confirm the leaks are closed
- Run BrowserScan's fingerprint analysis to verify overall profile consistency and authenticity
For VPN users, a dedicated VPN checker workflow can also help verify that DNS, WebRTC, and IP tests all agree after configuration changes.
BrowserLeaks Setup Checklist
Use this checklist before each testing session:
- Created a clean browser profile for isolation testing
- Decided between baseline and isolation testing goals
- Connected VPN or proxy before starting network tests
- Reviewed BrowserLeaks site settings and disabled unnecessary third-party requests
- Ran IP test first and confirmed VPN exit identity
- Ran DNS leak test and confirmed no ISP resolvers
- Ran WebRTC leak test and confirmed no private or real IP exposure
- Ran canvas, WebGL, and TLS tests and noted fingerprint values
- Applied fixes and re-tested
- Cross-checked with a second tool like BrowserScan
Related reading
- What Is BrowserLeaks? Privacy Leak Testing Explained - Learn what BrowserLeaks is, how its fingerprint, WebRTC, DNS, and TLS tests work, what results mean, and how to use it to fix privacy leaks.
- Chameleon Mode Pricing: Plans, Costs & What You Get - Chameleon Mode pricing explained: Basic $19/mo, Plus $69/mo, Pro $199/mo, yearly discounts, AI add-ons, and how to verify your browser setup.
- PrivacyTools.io Pricing: Free vs Paid Privacy Tools in 2026 - Understand PrivacyTools.io pricing: most listed tools are free and open source, while premium VPNs, email, and cloud storage use paid plans. Compare costs and free alternatives.
Sources and further reading
- Browserleaks - Check your browser for privacy leaks - BrowserLeaks is a suite of tools that offers a range of tests to evaluate the security and privacy of your web browser. These tests focus on identifying ways in which websites may leak your real IP address, collect information about your device, and perform a browser fingerprinting.
- Defeat BrowserLeaks: Step-by-step Guide - Is your browser leaking your secrets? Discover how to test for privacy risks with BrowserLeaks and mask your footprint using Kameleo!
Frequently Asked Questions
Is BrowserLeaks safe to use?
Yes. BrowserLeaks states that it does not collect personal data, store user fingerprints, or set non-essential cookies. The tests run locally in your browser. You can further reduce third-party requests by disabling analytics, maps, and ads in the site settings.
Do I need to install anything to use BrowserLeaks?
No. BrowserLeaks is entirely web-based. There is no download or installation required. If you are looking for an app version, you will not find an official one, and you should be cautious of third-party downloads claiming to be BrowserLeaks. The same applies to most modern privacy testing tools, which run in the browser for security and convenience.
What is the difference between a DNS leak and a WebRTC leak?
A DNS leak means your domain name queries are sent to a DNS server outside your VPN tunnel, typically your ISP's resolver. A WebRTC leak means the WebRTC API in your browser reveals your real IP address through STUN server communication, even when your regular traffic is routed through a VPN. They are separate failure modes that require separate tests and fixes.
How often should I run BrowserLeaks tests?
Run tests whenever you change your VPN, proxy, browser, or privacy extensions. Also run a quick IP and DNS check after connecting to a new VPN server. For routine monitoring, a monthly baseline test is reasonable for most users.
Why does my canvas fingerprint stay the same even in private browsing mode?
Private browsing mode does not change your hardware, GPU, OS, or browser rendering engine. Canvas fingerprints are derived from those stable attributes, so they remain largely unchanged in private mode. Reducing canvas uniqueness requires fingerprint protection tools or an anti-detect browser that spoofs rendering values.
Can BrowserLeaks detect my real identity?
BrowserLeaks does not attempt to identify you personally. It shows the technical data your browser exposes. Whether that data can be linked to your identity depends on how unique the combination is and what other tracking data is available to the sites you visit.
Conclusion
A proper BrowserLeaks setup is more than visiting the homepage. It means preparing a clean test environment, configuring site settings, running the core tests in a logical order, and interpreting results as either true leaks or expected fingerprint signals. DNS, WebRTC, and IP tests should always be run with your VPN or proxy active. Fingerprint tests should be evaluated for uniqueness and consistency, not just raw values.
After fixing leaks, verify the results with a second tool. BrowserScan provides an independent authenticity check that complements BrowserLeaks well, especially when you need to confirm that your browser profile looks consistent after applying privacy changes. Regular testing with a structured workflow is the most reliable way to keep your browser from leaking more than you intend.